Sunday 21 June 2015

postgresql 9.3 pg_dump from remote to local

This should work for a lot more versions as well. 9.3 happens to be the version I am using at the moment.

1
In remote server, edit /etc/postgresql/9.3/main/pg_hba.conf, and change it to
host all all 192.168.0.0/24 password 
It means allow any user from IP 192.168.0.x to connect any database by password. 

2
In remote server, edit /etc/postgresql/9.3/main/postgresql.conf and change it to
listen_addresses = '*'
It specifies the IPs on which the server is to listen for connections, which, in this case, means any IP.

3
Lastly, at local machine do below to pg_dump from remotehost to local machine. 
pg_dump -C -h remotehost -U remoteuser dbname | psql -h localhost -U localuser dbname


Sunday 3 May 2015

install ubuntu 14.04 on macbook pro Mid-2014

I received a MacBook Pro "Core i7" 2.5 15-Inch (Dual Graphics - Mid-2014 Retina Display), a.k.a. MacBookPro 11.3 model, from work recently. I am not a fan of MacOS, and for work purpose, I am better off using Ubuntu 14.04. There are plenty of howtos on the internet, however, if you have the exact model and would like to install Ubuntu 14.04, this post might help.

1. Prepare a ubuntu iso bootable usb. Since lots of files will be copied over to your MacBookPro, try to use a USB 3.0 thumb drive. Please google how to do it. You should not have any problem at this step.

2. Boot into MacOS and use its Disk Utility to resize or shrink the MacOS partition to open up space for Ubuntu. You do not have to format the new space here. I do it in Ubuntu via GParted, a UI partition tool using the bootable usb drive. For some unknown reason, the Disk Utility in MacOS can not always create the partions as I want.

3. Boot up your Mac with an OPTION key held, and select the EFI icon to boot the thumb drive.

4. Enter "Install Ubuntu" mode, select the last option to set up your partitions yourself. Assign 16GB(16GB RAM on my MacBookPro) for swap partition and whatever space you want for ubuntu partition. Make sure you mount your main ubuntu partition as root '/'. Proceed to install.

5. After installation, do NOT restart. We need to fix the EFI boot order information. Press Ctrl+Alt+F1 (notice Fn+F1 is equivalent to F1 on your MacBookPro keyboard) to open a terminal, and type the following

sudo apt-get install efibootmgr
sudo efibootmgr

You should see "ubuntu" is listed as Boot0000*. If you had booted into MacOS before installation, you should see two other boot entries, Boot0080* and BootFFFF* (these were created by MacOS), but the EFI BootOrder is 0080, which would make the laptop boot into MacOS only. To fix this, type


sudo efibootmgr -o 0,80

6. run sudo reboot to restart and you will boot into ubuntu.


7. At this point, your wireless card is still not installed. I happen to have a USB wireless card and ubuntu can handle plug-n-play for it. With access to internet, run below to install your wireless card on your MacBookPro.

sudo apt-get update
sudo apt-get install bcmwl-kernel-source

Done.

Monday 6 April 2015

install apache 2.2.x on ubuntu 14.04

By default, in ubuntu 14.04, if you do

sudo apt-get install apache2
apache 2.4.x would be installed. This is because ubuntu 14.04 'default' repository only contains 2.4.x. You can add ubuntu old version's repository from 'Ubuntu Software Centre'


  • Ubuntu Software Centre => 'Edit', a tab on top => 'Software Sources...' a menu item => 'Other Software' a tab item on top => click on 'Add...' button => on 'APT line' text field, put in 'deb http://archive.ubuntu.com/ubuntu precise main'. See below:

'precise' is the code name for ubuntu 12.04 LTS. 12.04 LTS comes with apache 2.2.x. After above, the 'precise' repository could be seen by

sudo apt-cache showpkg apache2

However at this point apt-get would still select apache 2.4.x over apache 2.2.x

  • Edit file /etc/apt/preferences  to assign higher priority to apache 2.2.x
below is an example

Package: apache2
Pin: release n=precise
Pin-Priority: 1000
Now, if you run below, if would use apache 2.2.x from 'precise' repository now.

sudo apt-get install apache2
Command above would probably complain something about dependencies on apache2.2-common and others. Doing below instead should work

sudo apt-get install apache2=2.2.22-1ubuntu1 apache2.2-common=2.2.22-1ubuntu1 apache2.2-bin=2.2.22-1ubuntu1 apache2-mpm-worker=2.2.22-1ubuntu1

Monday 2 February 2015

progress bar for file upload with Apache HttpClient 4 and StringEntity

There is a similar solution on stackoverflow, and it uses MultipartEntity to upload a file. However, if you are required to use StringEntity and put file data into JSON POST request like what I needed to do, please see my source code below.


code extract to use HttpPost with StringEntity with JSON in it.
        String jsonRequest = "the file data and related stuff";  
        StringEntity stringEntityForProgressBar = new StringEntity(jsonRequest, progressBean);  
        httpPost.setEntity(stringEntityForProgressBar);  
        HttpResponse response = httpClient.execute(httpPost);  


My own StringEntity.java

 import java.io.IOException;  
 import java.io.OutputStream;  
 import java.io.UnsupportedEncodingException;  
 import com.edentiti.registrations.verification.ProgressBean;  

 public class StringEntity extends org.apache.http.entity.StringEntity  
 {  
      private ProgressBean _progressBean;  
      public StringEntity(String string, ProgressBean progressBean) throws UnsupportedEncodingException  
      {  
           super(string);  
           _progressBean = progressBean;  
      }  
      private OutputStreamProgress outstream;  
      @Override  
      public void writeTo(OutputStream outstream) throws IOException  
      {  
           this.outstream = new OutputStreamProgress(outstream, _progressBean, getContentLength());  
           super.writeTo(this.outstream);  
      }  
 }  


My own StringEntity.java, for my own purpose, the progress goes up to 70% here and you can adjust it(e.g. up to 100%) to suit your own purpose.

 import java.io.IOException;  
 import java.io.OutputStream;  
 import com.edentiti.registrations.verification.ProgressBean;  

 public class OutputStreamProgress extends OutputStream {  
      private final static int CHUNK_SIZE = 40960; // Ming feels it is a lucky number, no solid reason for it.  
      private ProgressBean _progressBean;  
      private long _contentLength;  
   private final OutputStream outstream;  
   private volatile long bytesWritten=0;  
      public OutputStreamProgress(OutputStream outstream, ProgressBean progressBean, long contentLength)  
      {  
           this._progressBean = progressBean;  
           this._contentLength = contentLength;  
     this.outstream = outstream;  
   }  
   @Override  
   public void write(int b) throws IOException {  
     outstream.write(b);  
     bytesWritten++;  
   }  
   @Override  
   public void write(byte[] b) throws IOException {  
           int numChunks;  
           if (b.length % CHUNK_SIZE == 0)  
           {  
                numChunks = b.length / CHUNK_SIZE;  
           }  
           else  
           {  
                numChunks = (b.length / CHUNK_SIZE) + 1;  
           }  
           for (int i = 0; i <= numChunks; i++)  
           {  
                // if last block  
                if (i == numChunks)  
                {  
                     write(b, i * CHUNK_SIZE, b.length);  
                }  
                else  
                {  
                     write(b, i * CHUNK_SIZE, CHUNK_SIZE);  
                }  
           }  
   }  
   @Override  
   public void write(byte[] b, int off, int len) throws IOException {  
     outstream.write(b, off, len);  
     bytesWritten += len;  
           long progressValue = (long) ((70 * getWrittenLength()) / _contentLength);  
           if (progressValue > 70)  
           {  
                progressValue = 70;  
           }  
           if (progressValue < 1)  
           {  
                progressValue = 1;  
           }  
           // here we only allow something between 1 to 70  
           _progressBean.setValue(Long.valueOf(progressValue));  
   }  
   @Override  
   public void flush() throws IOException {  
     outstream.flush();  
   }  
   @Override  
   public void close() throws IOException {  
     outstream.close();  
   }  
   public long getWrittenLength() {  
     return bytesWritten;  
   }  
 }  


References:

  1. http://stackoverflow.com/questions/7057342/how-to-get-a-progress-bar-for-a-file-upload-with-apache-httpclient-4

Sunday 1 February 2015

seam richfaces progress bar

What I want to achieve here is:


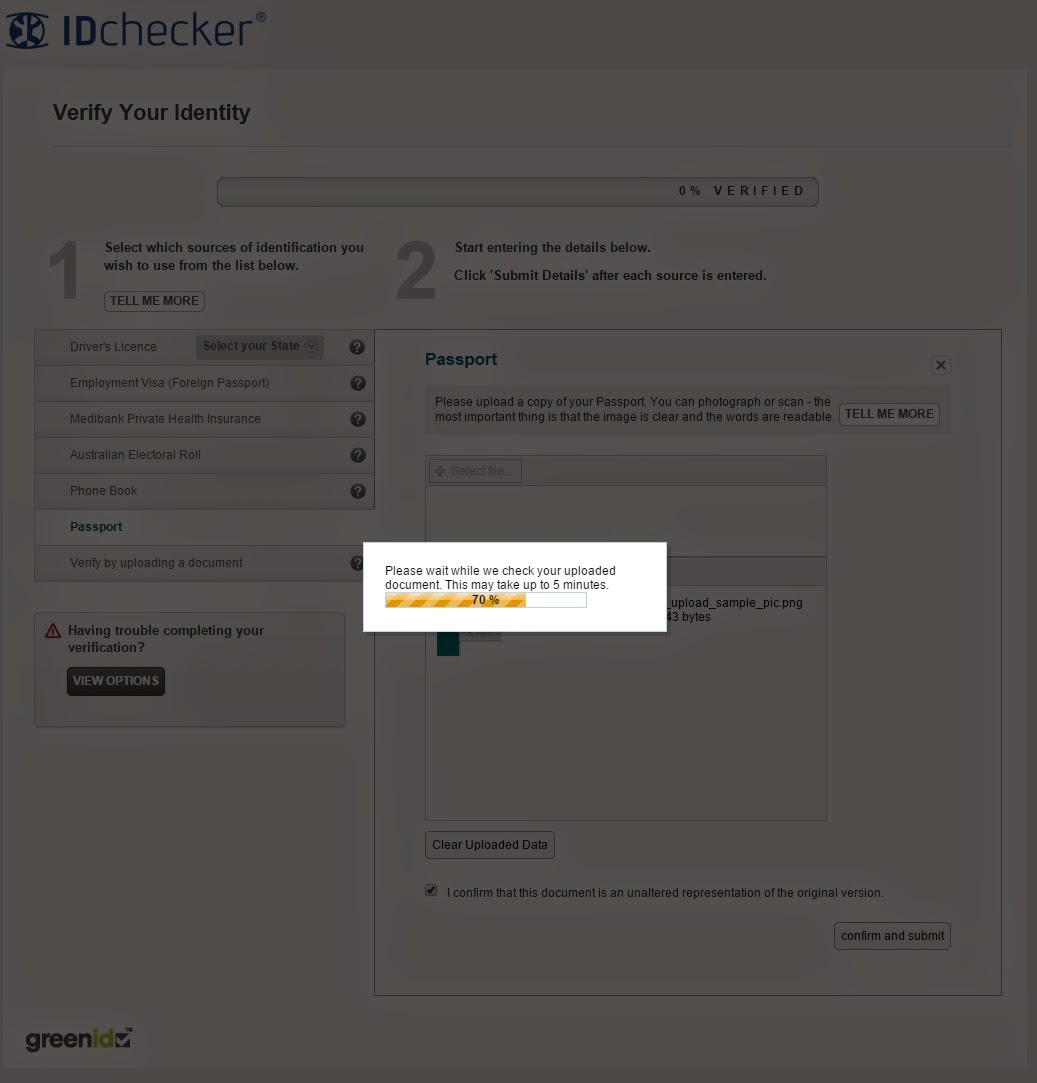
After the end user clicks on 'confirm and submit' button, the server processes the input which could take minutes. While the end user is waiting, we show a richfaces modal with a progress bar to indicate the progress. When the processing is done, server redirects end user to the processing result URL.

 <h:form id="form-passportupload">  
           <a4j:commandButton value="confirm and submit" action="#{progressBarVerifier.updateDocumentAsync()}" oncomplete="#{progressBarVerifier.isPageValidated}?Richfaces.showModalPanel('progressBarModal'):Richfaces.hideModalPanel('progressBarModal');"  
                          ignoreDupResponses="true" ajaxSingle="true" reRender="progressBarPanel,fileupload-error,fileupload-terms-confirm">  
           </a4j:commandButton>  
 </h:form>  


      <rich:modalPanel id="progressBarModal">  
           <h:form>  
                <a4j:outputPanel id="progressBarPanel">  
                Please wait while we check your uploaded document. This may take up to 5 minutes.  
                <rich:progressBar value="#{progressBarVerifier.progressBean.value}" label="#{progressBarVerifier.progressBean.value} %" minValue="0" maxValue="100" timeout="300000" interval="3000" enabled="#{progressBarVerifier.progressBean.enabled}" >  
                  <f:facet name="initial">  
                    <h:outputText value="Processing" />  
                  </f:facet>  
                  <f:facet name="complete">  
                    <h:outputText value="Process completed">  
                         #{redirectHelper.redirectToVerifySinglePage()}  
                    </h:outputText>  
                  </f:facet>  
                </rich:progressBar>  
                </a4j:outputPanel>  
           </h:form>  
      </rich:modalPanel>  


ProgressBean looks like this. Please note the value is updated in updateDocumentAsync() method. At the back end, we use Httpclient to do the POST and update ProgressBean.value in the process.


 public class ProgressBean  
 {  
      private boolean _enabled = false;  
      public boolean isEnabled()  
      {  
           return _enabled;  
      }  
      public void setEnabled(boolean enabled)  
      {  
           _enabled = enabled;  
      }  
      private Long value = new Long(0);  
      public Long getValue()  
      {  
           return value;  
      }  
      public void setValue(final Long value)  
      {  
           this.value = value;  
      }  
 }  


asyncUpload() method has to be Seam @Asynchronous and you can do server end validation before it. Otherwise, progress bar will not start to update until updateDocumentAsync() has finished.


 public void updateDocumentAsync() throws Exception  
 {  
   _validator.doValidation();  
   _asyncUploader.asyncUpload();  
 }  


Please see attached screen shot below for the results.


References:
  1. https://achorniy.wordpress.com/2010/10/22/show-dynamic-process-progress-in-seam-richfaces/ 
  2. http://forkbomb-blog.de/2011/time-consuming-processes-with-seam-richfaces-a4jpoll-and-quartz 
  3. http://docs.jboss.org/richfaces/latest_3_3_X/en/devguide/html/rich_progressBar.html

Saturday 13 December 2014

FTP download file using Bash script

Recently, I need to download a file daily from external FTP site, process the downloaded file locally and store the result into database. Below is the part of bash script to download a file. Just run the Bash file with Cron, job well done.


cd $DIR_TO_STORE_FILE_DOWNLOADED

# Call 1. Uses the ftp command with the -inv switches.  -i turns off interactive prompting. -n Restrains FTP from attempting the auto-login feature. -v enables verbose and progress.

ftp -inv $HOST << EOF

# Call 2. Here the login credentials are supplied by calling the variables.
user $USER $PASS
get $FILE_NAME_TO_DOWNLOAD
bye
EOF

Sunday 9 November 2014

Java exception: null value was assigned to a property of primitive type setter


When adding a new property to an existing entity, Java might complain that 'null value was assigned to a property of primitive type setter' at run time.
The reason is the existing entities have null value in the database for the newly added column.


The SQL query to add a property might look like below:

alter table registration add column cost double precision;

One way to overcome this is to use below get method instead of the standard one.


 public void setCost(final Double cost)  
 {  
  _cost = cost;  
 }  
 public static Double getCost(final Double cost)  
 {  
  if (cost == null)  
  {  
   return new Double(0.0);  
  }  
  else  
  {  
   return cost;  
  }  
 }  


Another way would be setting default value for the newly field in the database, which might not always easy for a large live production database. The SQL query might look like below:


alter table registration add column cost double precision default 0